Showing posts with label Spray Paint. Show all posts

Thursday, June 21, 2012

BIG Teapot tutorial!


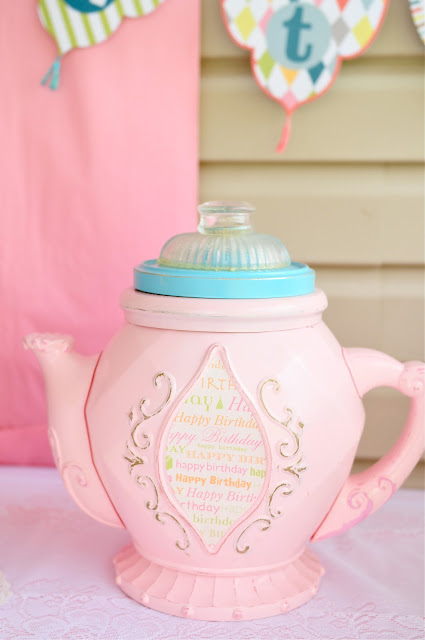
As promised, here is the tutorial for the large teapot seen at my daughter's 7th birthday party!
I bought one of these ugly plastic teapots (used to hold disney princess tea cups and plates, etc...) It was $1 at DI, it had no lid so I bought one at DI for 50 cents that fit on top! You could stop there with the lid.....but I couldn't! Next I spray painted my teapot pink, took the knob off the lid, and sprayed it as well. I had the ceiling pieces to the chandelier sitting in my garage, so I of course had to paint the gold metal part aqua, hooked it onto the pink lid with a bolt, gorilla glued the crystal dome on, and I had a percolator top for teapots that I bought at Smith and Edwards for a couple bucks that I gorilla glued to the dome! (I think it would be just as cute, and much easier to just to the pink part of the lid, and srew a hobby lobby crystal knob on in place of the one that came on it) ;) I also sanded all the raised area and edges, cut a paper to fit the opening, sprayed the back of the paper with spray adhesive, and stuck it on!

                                       There you have it! A large teapot for under $5!

Thrift store Mirrors + a chandelier= FUN!

 I bought 2 of these mirrors at a thrift store for $4 a piece!!!!
 Spray painted them.... (don't be alarmed when you spray a high gloss wood like this and you get these bubbles that won't take paint, when you distress it, it makes it look extra good!)


 sanded and distressed!


 (sorry about the crappy lighting)

Here they are in my daughter's room, I just need to update the picture in the middle of them, and make the photo a bit larger! Love the mirrors! (I also found this chandelier for $5 the same day, and refinished it with the same spray paint! (it was gold) then I hooked some of my left over chandelier crystals on it to add some bling, and hung it above her tea party table (which I also bought at a thrift store the next week, I will post it as soon as I get pics!)

Thursday, May 10, 2012

Spray Painted Flowers.. WHA?!??!


Have you all seen these "purple ball flowers" as i like to call them. 
I guess their technical name is Alliums.


The are one of my FAVORITE spring time flowers!
Unfortunately mine have already came and gone, and are now looking like this....

Getting sadder and sadder by the day.
These two are the best looking ones.
But i decided it was time to cut them all down and 
get ready to plant my new summer flowers anyways!

After cutting them i decided they are still pretty cool looking
and maybe i could just put some in a vase or something?

Then i decided, it might be even cuter to spray paint them!
So i did.

And here my friends, is what they look like after!


Pretty cute eh??
You could do them any color and come up with some
pretty darling little assortments!
How fun for centerpieces for parties, 
or a cute little Mother's Day bouquet!
A little twist on "hand picked" flowers for Mom!

I dont know how long they will last,
but for now they are going to look so cute on my kitchen table.
:)


Wednesday, May 9, 2012

Porch makeover! From way drab....to......bright and FAB!!!!

Amanda:
 Before......................................................................................After
 Just like the rest of my house used to be... neutral with no color! 
So BORING and Un-inviting right??!
 $6 lantern from shopko (spray painted yellow)


My door was a very boring tan (just like the molding) and didn't pop at all, it was so blah and ugly! I painted it black with exterior paint and a foam roller brush, I LOVE it and wish I would have painted it LONG ago! (notice my wreath and mat from past posts)

 Now, this is the same ugly tan cheap plastic bench, I spray painted it and the other chair shown here! I also spray painted the 3 pots that I already had laying around the garage (they were all terra cotta rust colored) The table was given to me and was used in my daughters room until she got a new one from DI, so I decided to use this one on my porch!


 The table has a circular piece of burlap on it (to tie in with my wreath) a clear 50 cent vase with sticks pruned from my Mom's trees, a potted plant, a dollar store candle and glass votive, and a dollar store mirror frame that I sprayed white! The pillows are sewn slip covers (so I can swap them out for fall).
 Now this porch finally says Welcome to my home! ;)


---------------------------------------------------------------------------------


Jacey's 
When thinking how i wanted to do my porch, all i knew was i wanted it BRIGHT & FUN.
Not Really any color limitations, just anything colorful!


This pot used to be a dark tealish/gray color
that i just spray painted aqua!

I knew i wanted a monogrammed wreath,
but i was sick of your regular circle wreaths!
I Just took a picture frame i had lying around, made some rolled roses out of the fabric i used for my pillows, and added a J that i spray painted fuchsia.
 Simple. Easy. Different.


Chandelier anyone?
Strange for a front porch??
I love it!! I think it adds just the right feel i was going for!


OH how i love my porch swing!
And now even more with these pillows!


We are now ready to welcome summer!!
How have you spruced up your front porches?!?!
We'd love to see & do some guest posts on what you've come up with!

Monday, April 23, 2012

A Weekend of Projects at the Jordan Household!

Well! I kept myself very busy this weekend with a few fun projects!
First a little yard work...

Amazing the difference a little weed pulling can make!
Im so excited for this time of year and getting out in the yard, planting flowers and gardens, OH! i LOVE being outside!


CEILING FAN MAKE OVER
So my next project, in my living room, when we moved in there was this brand new fan in there. So of course being brand new, Michael said we couldnt replace it, even if the color didnt match!
Men... they just dont understand! ;)


So i have of course decided to, HELLO! 
Just spray paint the dang thing!
Most fans will have a color on each side.
Unfortunately, this one was a cherry wood color on the other so i couldnt use it either!


With a few screws out, we were ready to paint!
I just went with black, to match my living room colors.


And there ya go! Simple, EASY fix to a butt ugly fan color! :)

MAKING YOUR OWN FRAME

So i have this temple picture for my living room ive been wanting to frame for awhile. My initial plan was to get a pre-made open back frame from hobby lobby for it. 
Unfortunately, everytime i went to get one, they never had the right size. And to custom order a frame for it would of been over $200. SO-- i of course improvised. :)

I decided to make one out of baseboard.
We went to lowes and i picked out a design i liked.


My FIL actually helped me with cutting the angles and attaching them. He is really good with that kind of stuff and we was free that day so it worked out perfect!

We cut our pieces 1/4 inch smaller than the actual size of the print. That way the print would butt up against the frame rather than slide right through.  
We attached the pieces with a few brad nails, staples, and a little bit of wood glue. After it was set, i spray painted it black.

distressed it up a bit...
added a mounting bracket..

And there ya go! 
A beautifully framed temple print AND frame for under $70!!


Amanda and I take/sell these temple prints. 
To view our different temple pictures, visit our photography websites! 

Sunday, March 18, 2012

{Jacey} Headboard MAKEOVER!

SO- Our room has been under a re-model since LAST SPRING.
As in Spring of 2011. 
AKA almost ONE year.
Welcome to projects at the Jordan Home.
Uh hum.. especially since SOMEONE thinks its neat to start right up on the next project before the first one is done. whoops.
what can i say?? i like to keep myself busy! :)


So i just need a few more finishing touches and i will share the WHOLE room makeover with you!

On to our NEW headboard---
first things first...
remember how i have a tiny 100 year old home??
oh yeah, well i do. and i love it.
SO- sometimes you have to get creative with furniture!

I used to think it was neat to get a big ol' 6 piece bedroom set,
ya know with a dresser, a chest of drawers, night stands, headboard and footboard, etc etc etc. 
I was really disappointed 3 years ago when we got our house and i was going to be unable to get a "set" due to our space.
Umm... pretty much im SO glad we didnt! 
I dont care how big your space is, 
all that big bulky furniture is just TO MUCH!
Plus, it limits your ability to be creative 
and make your space unique!

Anyway- To the project.
We've never had anything except a mattress and frame for our bed.
Since we've lived here i have been trying to figure out a way to jazz up the bed SOMEWAY so it just didnt look like a frumpy old bed sitting in the corner.
(OHH! Another perk of our small house! Our bed has to be up against one wall. Honestly, the biggest annoyance/nuisance EVER! Do you know how hard it is to make a KING size bed up against a wall every morning?!?! Hard. Trust ME!)

This is what our bed looked like BEFORE with NO headboard.
(Sorry, this is a pic off my instagram, its the only one i had of it without!!)

Ugh...can you say BORING!?!?
Very.
I went back and forth between ideas for MONTHS and MONTHS
of what to do about the situation.
I finally settled on the simplest of all my different ideas.
We have all seen old doors used for headboards on pinterest.
SUCH a cute and simple, easy idea!


Here is the door before.
I spray painted it with a mustard yellow color.
Just one coat.
 I still wanted it to look old so i didn't want to lay it on to thick, especially since it was a gloss paint 
and i definitely did NOT want it glossy!


After painting and curing for a few days 
i sanded her down really good. 
A) to distress it of course,
and B) to get any sharp edges off 
seeing as we'd be resting our heads by this every night!

We hung it on the wall using L Brackets.
We used four along the top, and four along the bottom.
These old doors are HEAVY!
Much heavier than doors these days!

And easy as that-- A whole new look! 
Thanks to my cute husband and brother for hanging her for me!


What do you think?!?


Give me til April and i will show you the whole room!
It's all coming together quite nicely! :)